Groups allow information and user exchanges to be compartmentalised in the iAdvize administration. Although rarely used, they are relevant for certain organisations of agent teams. Make sure not to confuse "Groups" and "Skills".
The video below shows you the importance of managing user groups:
1. How user groups work
Depending on the user's role (administrator, manager or agent), assigning the user account to a group will have different consequences on how iAdvize is used.
1.1 Administrators who do not belong to a group
In the users section :
- All agents are viewable
- All agents / managers / administrator / expert can be modified
In the group section :
- All groups are visible
In the reports :
- Reports of all agents are viewable.
- When a group comparison is performed, all the data of all the groups appear.
- Data accumulate from subgroups to groups (for example, if there are three conversations in group A.1, and one conversation in parent group A, then four conversations will be displayed in group A).
In the conversations log :
- All contacts of all agents are displayed.
In the supervision :
- All agents are displayed.
- It is possible to filter by group. All groups are viewable.
In the discussion panel :
- It is possible to forward a chat to all the agents on the same site.
1.2 Administrators belonging to a group
For administrators, the behaviour is exactly the same as for managers (partitioned statistics and past discussions). However, administrators have the rights needed to set user groups.
1.3 Manager who does not belong to a group
In the users section :
- All agents are viewable.
- All agents/managers/expert can be modified but only on the site(s) assigned to the manager.
In the group section :
- All groups are viewable
In the reports :
- Reports of all agents belonging to the same site(s) as the manager are viewable.
- When a group comparison is performed, all the data of all groups and subgroups appear but only for the agents belonging to the same site(s) as the manager.
- Data accumulate from subgroups to groups (for example, if there are three conversations in group A.1, and one conversation in parent group A, then four conversations will be displayed in group A).
In the conversations log :
- All the contacts of all agents belonging to the same site(s) as the manager.
In the supervision :
- All agents belonging to the same site(s) as the manager are displayed.
- It is possible to filter by group. All groups are viewable
In the discussion panel :
- It is possible to forward a chat to all the agents on the same site whatever their skills and having no groups.
(Note: it is possible to forward a chat to agents of another group or subgroup authorizing transfers)
1.4 Manager belonging to a group
For managers, the impact is more significant. Managers belonging to a specific group can only access statistics of the agents of the same group. This is also the case to consult the history of previous conversations.
In the discussion panel :
- It is not possible to forward a chat to a manager without a group.
1.5 Agent who does not belong to a group
In the discussion panel :
- It is possible to forward a chat to all the agents of the same site whatever their skills and having no groups.
(Note: it is possible to forward a chat to agents of another group or subgroup authorizing transfers)
1.6 Agent belonging to a group
For agents, the only impact concerns the chat forwarding feature. An agent belonging to a group will only see agents from the same group. It is therefore impossible to forward chats to agents from other groups unless you have selected this option while creating the group see also below (3).
An agent belonging to a group won't be able to forward his chat to another agent who doesn't belong to a group.
2. Adding a group
To edit or create a new group, select "Settings" on the upper menu bar and select "Groups" under "User Management".
Click the + button to add a new group.
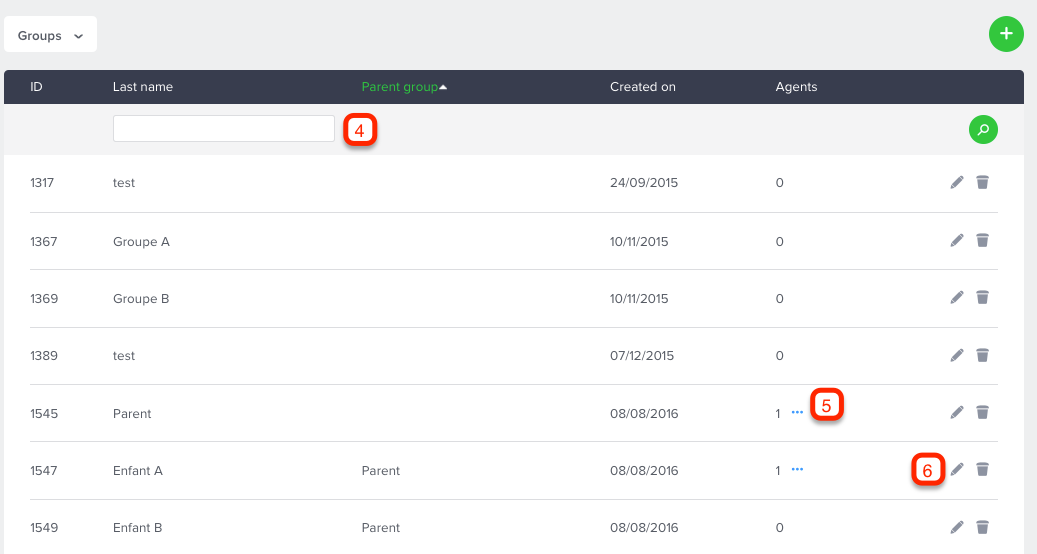
Here is how the group management will now look:

(1) Name the group to be added.
(2) If the group is a sub-group, choose the parent group to which it has to be assigned.
(3) Tick the checkbox if you want to open the forward from other groups to this one.

(4) Search to find a group.
(5) See the number of users assigned to a group. Click the icon  to identify the users concerned.
(6) Modify or delete a group.
3. Sub-groups
You can create groups and sub-groups. If a sub-group is assigned to a group, the latter becomes a parent group.
The user in the parent group can see data for users in the assigned sub-group (or forward chats to them). However, the reverse is not possible.
4. Assigning a group to a user
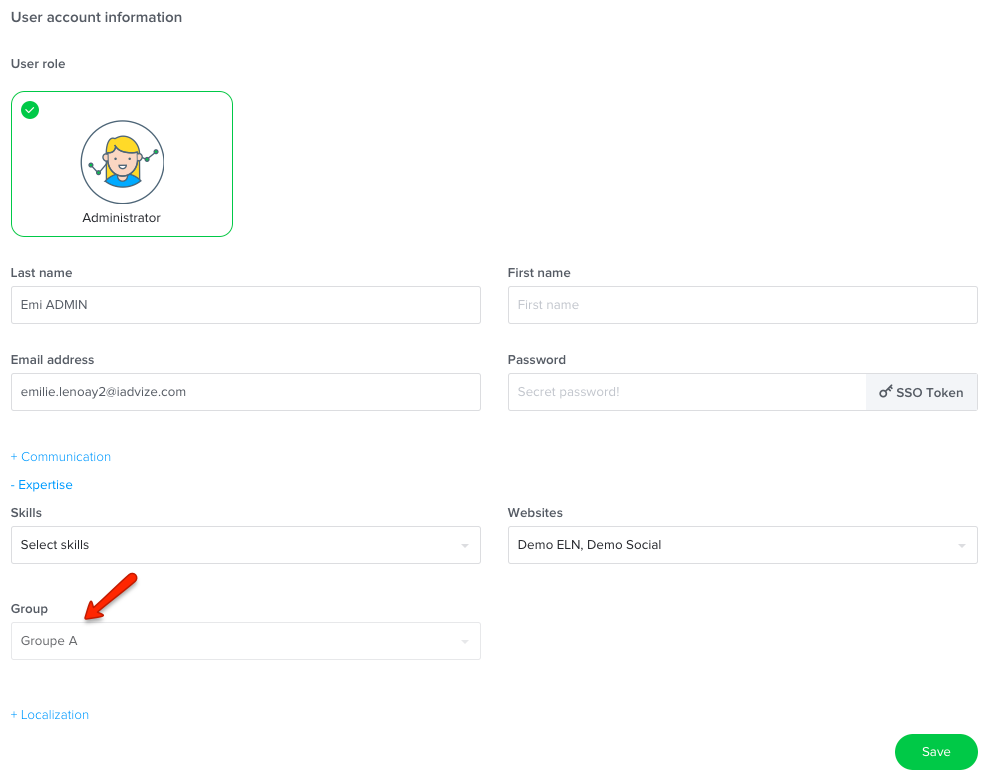
Once a group is created, it must be assigned to the relevant user accounts.
For this, you simply have to modify a user account, and in the section "Groups", select the group to be assigned:
Warning: When there is no group created, the section "Group" will not appear.
Warning Bis: Once a user account is assigned to a"Group" he can only see the statistics of this group ONLY

Read also: Create or modify a user account